
First let me share my #1 rule: DO NOT OVER-PLUCK!! Please! There is nothing pretty about thin overly-tweezed brows. Brows frame your eyes. Cardinal sin
#2: do not shape them into tadpoles with thin tails. Cardinal sin
#3: do not shave them or use a razor of any kind. If you have committed any of those crimes, with no judgment from me, I hope you’ll reconsider and start growing them back in (and if they don’t grow, try using a lash-growth serum on them or even your dad’s hair-growth serum!) my perferd way is using a nautral proudct like Almond oil or coconut oil.
Then, follow these six steps on how to get beautifully shaped brows.
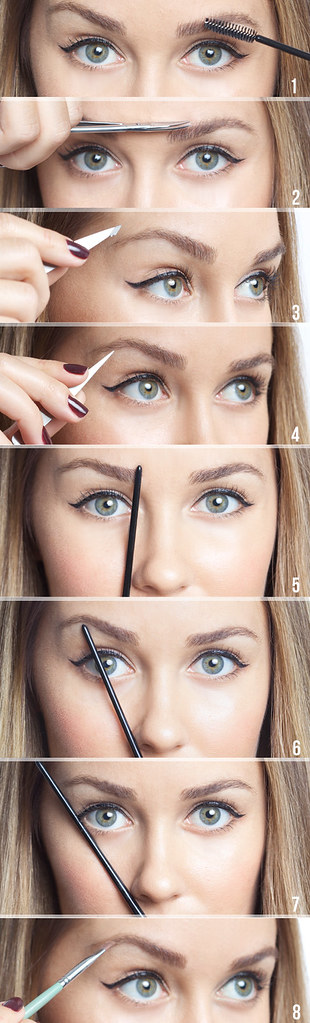
- spooly brush or disposable mascara wand
- cuticle scissors
- angled/slant tweezers
- pointed tweezers
- brow shadow (taupe for blondes, brown range for everyone else)
- stiff brow shadow brush
- pencil (to line up the angles).
Instructions
- With a disposable mascara wand or spooly brush, brush the hairs upward to prepare for Step 2.
- With a pair of scissors, trim any hairs that are longer than your brow shape.
- With angled tweezers, pluck areas above and below the brows, grabbing a couple at a time. I know some of u us eto using wax or trading as much as I admit that they are less painfull and quickest way to shape them but there are much more draw backs so my PREFFERD way is using TWEEZERS...
- With pointed tweezers, grab stubborn single hairs and shorter ones.
- To determine where your brow should start, hold a pencil or make-up brush along one side of your nose. Where it crosses the inner corner of your brow, that’s where it should begin.
- Now angle the pencil across the iris; that’s where the arch should begin.
- Angle it to the end of the outer corner of the eye; that’s where the brow should end.
- With those angles and lengths in mind, fill in the brows using light, feathery strokes as if you were drawing individual hairs.
I hope these tips been helpful and usefull for you guys... If you still have any burning quiestion you ln


No comments:
Post a Comment